





How to use Liquid Fertiliser

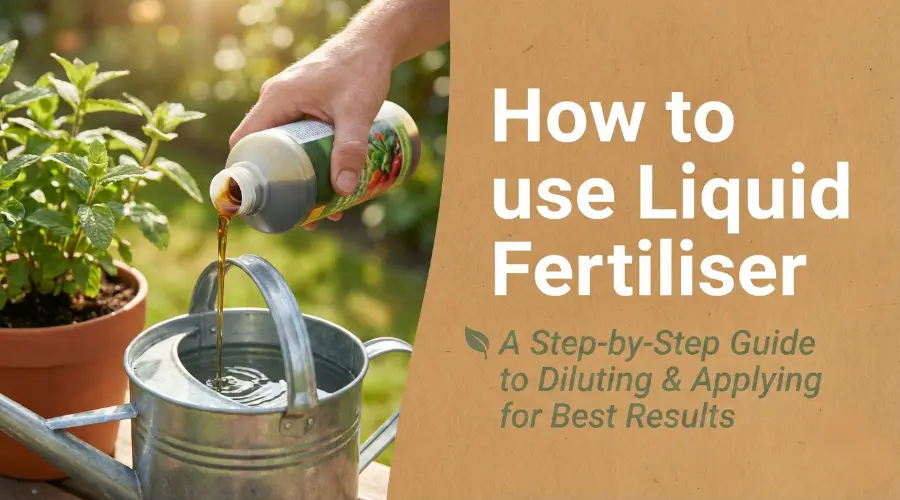
Gardening and farming are arts as much as they are sciences, blending patience with knowledge. In this intricate dance with nature, one of the most crucial steps is fertilization. But with a myriad of options available, it’s easy to get lost. Let’s dive into the world of liquid fertilizers, a choice that’s gaining popularity for its efficiency and ease of use, and as you enjoy a relaxing cup of tea, let’s learn how to use Liquid Fertiliser effectively.
Getting to know about the Liquid Fertiliser
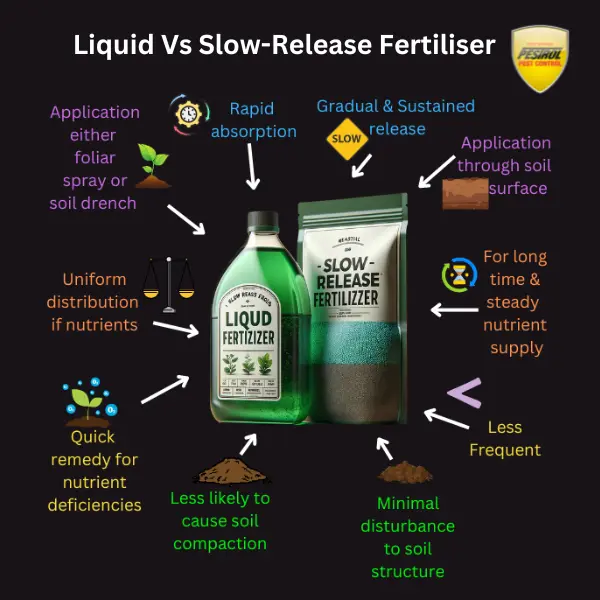
When it comes to feeding our plants, liquid fertilizer is like a quick and easy meal for them. Liquid fertilizers are great for giving your plants exactly what they need. They are made to help certain kinds of plants or crops grow better.
It’s this concentrated liquid packed with all the good stuff plants crave: nitrogen, phosphorus, potassium, and a bunch of other nutrients. The cool thing is, you can just mix it with water and either pour it around the roots or spray it on the leaves. Plants love it because they can soak up all these nutrients super fast – it’s like getting an instant boost.
What’s great about liquid fertilizers is how versatile they are. Whether you’ve got a veggie garden, a flower bed, or even some indoor plants, they all can benefit from it. And if you’re into precision, like really making sure your plants get just what they need, liquid fertilizer is your go-to. You can adjust how much and how often you use it, which is handy for keeping your plants happy without going overboard.
But, here’s the catch – since plants use up these liquid nutrients quickly, you’ll find yourself feeding them more often than you would with those slow-release granular types. And, to be honest, they can be a bit pricier and need careful storage. But, for that quick, effective nutrient boost, they’re worth considering.
Slow-release fertilisers
On the other hand, slow-release fertilizers release nutrients over a period, usually in a pellet form. They are coated with materials that gradually dissolve, providing a steady nutrient supply. This delayed release can be beneficial for long-term plant health. Granular fertilizers, while effective, often release nutrients slowly and can be unevenly distributed.
And then, the Organic fertilizers, such as compost or manure, release nutrients slowly and improve soil health but may not address immediate nutrient deficiencies. Chemical-based slow-release fertilizers provide a steady nutrient supply but lack the immediacy of liquid options.
For a more detailed comparison, check out the pros and cons of granular and liquid fertilizers
Types of Liquid Fertiliser
For new lawns, a balanced N-P-K ratio is key for growth. Once established, lawns benefit from high-nitrogen fertilizers for a green appearance. Late-season varieties have more potassium to prepare grass for cold weather.
Flower fertilizers contain higher phosphorus for better blooms and a balanced mix of nitrogen and potassium for overall plant health and growth.
Vegetable fertilizers offer a balanced N-P-K mix, crucial for leaves, roots, and fruit. They also include vital micronutrients like calcium and magnesium for quality growth.
Organic fertilizers, made from natural sources like fish emulsion and compost, provide essential N-P-K and improve soil health with beneficial microorganisms.
Starter fertilizers are high in phosphorus for root growth, with lower levels of nitrogen and potassium, aiding in the early development of new plants.
Foliar fertilizers are applied directly to leaves for quick absorption. They include essential micronutrients like iron and manganese to rapidly correct deficiencies.
Customized for specific plants like roses or orchids, specialty fertilizers have unique N-P-K ratios and specific micronutrients tailored for particular plant needs.
Advances in agronomic research and technology have led to the development of more efficient and plant-specific liquid fertilizers. This includes the creation of chelated micronutrients, which are more readily absorbed by plants, and controlled-release technologies even in liquid forms.


How to use Liquid Fertiliser
Step 1: Preparing the Soil
Alternativelty, If preparing the soil feels like too much work, you can just clear away any debris around your plants and give the soil some water if it’s dry deeper than two inches. This is a simpler way to get it ready for fertilizer.
Step 2: Mix it up
Step 3: Choose your method
Based on the soil test results, pick a fertilizer that has plenty of the nutrients your soil is lacking. Before using it, make sure to read the label carefully. Each liquid fertilizer has its own guidelines for how much to dilute it and how to apply it. It’s really important to follow these directions to keep your plants healthy. Pay attention to the right amount to use and any safety tips.
Remember, you have to water down concentrated liquid fertilizers so they don’t harm your plants. Just mix the fertilizer with water as the label says, using something like a watering can, bucket, or sprayer.
Soil Drenching (for the Roots)
Pour your mix around the soil at the base of your plant. This is great for feeding the roots.
Foliar Application (for the Leaves)
Grab a spray bottle and mist those leaves. This is a quick way for plants to absorb nutrients through their leaves.
When to use Liquid Fertiliser
During Active Growth Phases: Apply liquid fertilizer in spring and summer, as plants actively grow and demand more nutrients.
When Correcting Deficiencies: If you notice yellowing leaves or other signs of nutrient lack, use liquid fertilizer for an immediate boost.
At Planting or Transplanting Time: To support new plants or transplants, apply liquid fertilizer at the time of planting for quicker establishment.
During Flowering and Fruit Production: Enhance the development of blooms and fruits by applying liquid fertilizer when plants are flowering or fruiting.
Best Timing of the Day: Apply it early in the morning or late in the afternoon to avoid evaporation and maximize absorption by the plants.
For Regular Maintenance: Regularly use liquid fertilizer every 2-4 weeks throughout the growing season, following the specific product’s instructions.


1. What is the best way to apply liquid fertiliser?
Applying liquid fertiliser effectively is key to giving your plants a healthy boost, especially during their active growth phases. Here’s how to do it right, explained in a professional yet conversational way:
Choose the Right Fertiliser
Start by selecting a liquid fertiliser that matches your plants’ needs—look for a balanced formula with nitrogen, phosphorus, and potassium (NPK), plus essential micronutrients if possible.
Dilute Properly
Most liquid fertilisers are concentrated and must be diluted before use. Always follow the instructions on the label to avoid over- or under-fertilising, which can harm your plants or leave them wanting more. Use a clean container to mix, and consider using non-chlorinated or rainwater for sensitive plants.
Prepare the Soil
Lightly water your soil before applying liquid fertiliser. This helps the nutrients spread evenly and prevents “fertiliser burn” if your mixture is slightly too strong by accident.
Pick the Right Time
Apply liquid fertiliser early in the morning or late in the afternoon, when temperatures are cooler. This reduces evaporation and allows plants to absorb nutrients more efficiently.
2. Does liquid fertiliser need to be watered in?
Liquid fertiliser typically does not need to be “watered in” separately, because it is already diluted and applied with water as part of the fertilising process. Essentially, when you apply liquid fertiliser, you are combining both watering and feeding in one step—the fertiliser solution is poured or sprayed onto the soil, saturating the root zone just as you would with regular watering.
However, it is generally recommended to apply liquid fertiliser to soil that is already slightly moist, not bone dry. Lightly watering the soil beforehand helps ensure even distribution of nutrients and reduces the risk of root burn if the fertiliser is inadvertently applied too strongly. After applying the fertiliser, no additional watering is usually needed unless the soil feels dry and your plants require more moisture.
3. How much liquid fertiliser should I use?
The amount of liquid fertiliser you should use depends on the specific product, your plants’ needs, and the size of your garden or pots. Here’s how to approach it in a practical, professional way:
-
-
Follow the Dilution Instructions:
Always check the label on your liquid fertiliser for recommended dilution rates. For example, some products advise 10–20 mL of concentrate per litre of water for most houseplants and ornamentals, while others may suggest 1 tablespoon per gallon (about 4 litres) of water. It’s important to stick to these guidelines to avoid fertiliser burn or underfeeding your plants. -
Adjust for Plant Size and Type:
-
Larger plants or those in bigger pots will need more of the diluted fertiliser solution than smaller or younger plants.
-
Indoor plants and seedlings generally require less concentrated solutions and less volume per feeding.
-
-
Application Volume:
-
For potted plants: Water with the diluted fertiliser solution until it starts to drain from the bottom of the pot—this ensures the roots are reached without overwatering.
-
For garden beds or lawns: Apply the diluted fertiliser evenly over the soil surface, typically at a rate of about 1 litre per square metre for many home garden products.
-
-
Frequency:
-
Most liquid fertilisers are applied every 2–6 weeks during the growing season, but always refer to the product’s instructions for specific timing.
-
-
4. How to use liquid fertiliser on plants?
Using liquid fertiliser on plants is straightforward if you follow a few key steps for safe and effective application. Here’s a practical guide in a professional, conversational style:
1. Dilute the Fertiliser
Always start by diluting your liquid fertiliser according to the instructions on the product label. Most liquid fertilisers are concentrated and can harm plants if used undiluted. Mix the recommended amount into water, stirring well to ensure the nutrients are evenly distributed.
2. Prepare the Soil
Lightly water your plants or garden beds before applying liquid fertiliser. This helps the nutrients spread evenly throughout the root zone and reduces the risk of root burn if the fertiliser is accidentally applied too strongly.
3. Choose the Right Application Method
-
Soil Drench: Pour the diluted fertiliser solution directly onto the soil around the base of each plant. This is ideal for most garden plants and allows nutrients to reach the roots quickly.
-
Foliar Spray: For quick correction of nutrient deficiencies, you can spray the solution onto the leaves using a spray bottle. This method is especially useful when soil conditions limit nutrient uptake.
-
Drip Irrigation: For larger gardens or automated systems, you can add liquid fertiliser to your irrigation setup to deliver nutrients directly to the root zone.
4. Apply at the Right Time
Apply liquid fertiliser early in the morning or late in the afternoon to avoid evaporation and maximise nutrient absorption. This timing is especially important for foliar sprays.
5. What happens if it rains after applying liquid fertiliser?
If it rains after applying liquid fertiliser, the effect depends on the timing and intensity of the rain:
-
Light Rain or Shower:
Gentle rain shortly after applying liquid fertiliser can actually help the nutrients penetrate the soil and reach plant roots more effectively, especially if the soil was dry before application. This can enhance nutrient uptake and absorption. -
Heavy Rain or Downpour:
Heavy rainfall soon after fertilising can wash away the liquid fertiliser before plants have a chance to absorb it. This reduces the fertiliser’s effectiveness and may cause nutrients to be lost from the root zone or even carried away into waterways, potentially causing environmental concerns. -
Timing Considerations:
Ideally, you should apply liquid fertiliser when no rain is forecast for at least 24–48 hours, giving the plants enough time to absorb the nutrients before any significant rainfall occurs. If a heavy storm is expected, it’s best to postpone fertilising until after the rain has passed.
In summary, light rain can be beneficial by helping nutrients move into the soil, but heavy rain soon after application can negate the benefits of your fertiliser by washing it away before plants can use it.
6. How long does it take for liquid fertiliser to absorb?
Liquid fertiliser is absorbed rapidly by plants, with most nutrients becoming available within minutes to 24 hours of application. However, visible effects like new growth or greening may take 1–14 days to appear, depending on the plant’s health, application method, and environmental conditions. Here’s a detailed breakdown:
Absorption Timeline by Application Method
| Method | Absorption Starts | Full Nutrient Availability | Visible Effects |
|---|---|---|---|
| Foliar spray | 15–30 minutes | 2–3 hours | 2–3 days |
| Soil drench | 1–2 hours | 24 hours | 3–7 days |
| Drip irrigation | 30–60 minutes | 12–24 hours | 2–5 days |
 Mosquito Traps